Programmable Color Changing Fabric
This activities focuses on the creation of a programmable color changing yarn, which can then be knit, woven, or otherwise combined into a programmable color changing fabric.
How Does it Work?
This project leverages thermochromism, the quality of paritcular pigments or dyes to change from a color to transparent above a specified temperature. Specifically, heat causes the chemical structure of the pigments to change, leading our eye to percieve them as either a solid color or transparent. If we use electrical components to provide the heat needed for color change to occur, then we can essentially "program" the color changes by turning the heating elements on and off.
Steps
There are many ways to combine fiber, pigments, heat, and electronics but we'll focus on:
- creating a thermochomic paint or prepping a thermochromic dye
- applying the paint/dye mixture to fibers
- creating a tight coupling of heating wire to fiber
creating circuitry to programmatically power the heating wire.
Materials
- heat activated thermochromic dye
- or heat activated thermochromic pigment
- while you can buy dyes and pigments that transition between colors, I prefer to use pigments/dyes that trandition from color to colorless at about 86 celcius. I find bold colors (dark blues, greens, violets) have a more interesting visual effect than lighter colors (reds, pinks, yellows). The dyes produce a better hand quality on the fiber but tend to only produce muted tones, if you want darker and more concentrated color you are better off mixing your pigments with a transparant acryllic gel medium. This essentially suspends the pigments in a paint and the the higher the pigment/paint ratio is on mixing, the bolder the color.
- if using the dye, your fiber should be a cellulose-based material like cotton. If using the painting method, any fiber structure (paper, yarn, fabric, etc) can be used. For this specific lesson, we'll use wool yarns. I like working with wool because it holds heat nicely, allowing the effects of the color change to last a bit longer.
-
- magnet wire makes for a great heating element. The thinner the wire, the more heat produced (see Joule heating for more on the physics of this). I think 38 AWG (AWG = American Wire Gauge, a measure of the diameter of the wire) is about the thinnest yarn that's workable without breaking. Fun fact, the higher the AWG, the thinner the wire.
crimp beads
- arduino microcontroller and jumper wires
- (optional) external power supply
- N-Type MOSFET
Tools
- painting or dying tools
- drop spindle
- crimp beads
- sand paper
- wire cutters and clamps
- (optional) sewing needle and thread, knitting needles, looms, etc.
Procedure
1. Paint or Dye your Fiber
Prepare a thermochromic dye bath (according to the dye instructions) or mix acryllic medium with thermochromic pigments until you achieve your desired color (just add as much pigment as you like, more pigment = darker color). To achieve your desired consistency, mix in some water. Apply the dye or paint to your fiber using one of the following methods:
a. Hand Painting the Yarns.
Arrange the yarn along a table and manually paint along the length making sure to paint the front and back side. If you want to paint lots of yarn, consider attaching your yarn to a bobbin winder on a sewing machine or hand crank, holding a paint filled sponge with one hand to coat as you crank. If you can also paint directly upon a pre-made fabric.

b. Dying the Fibers
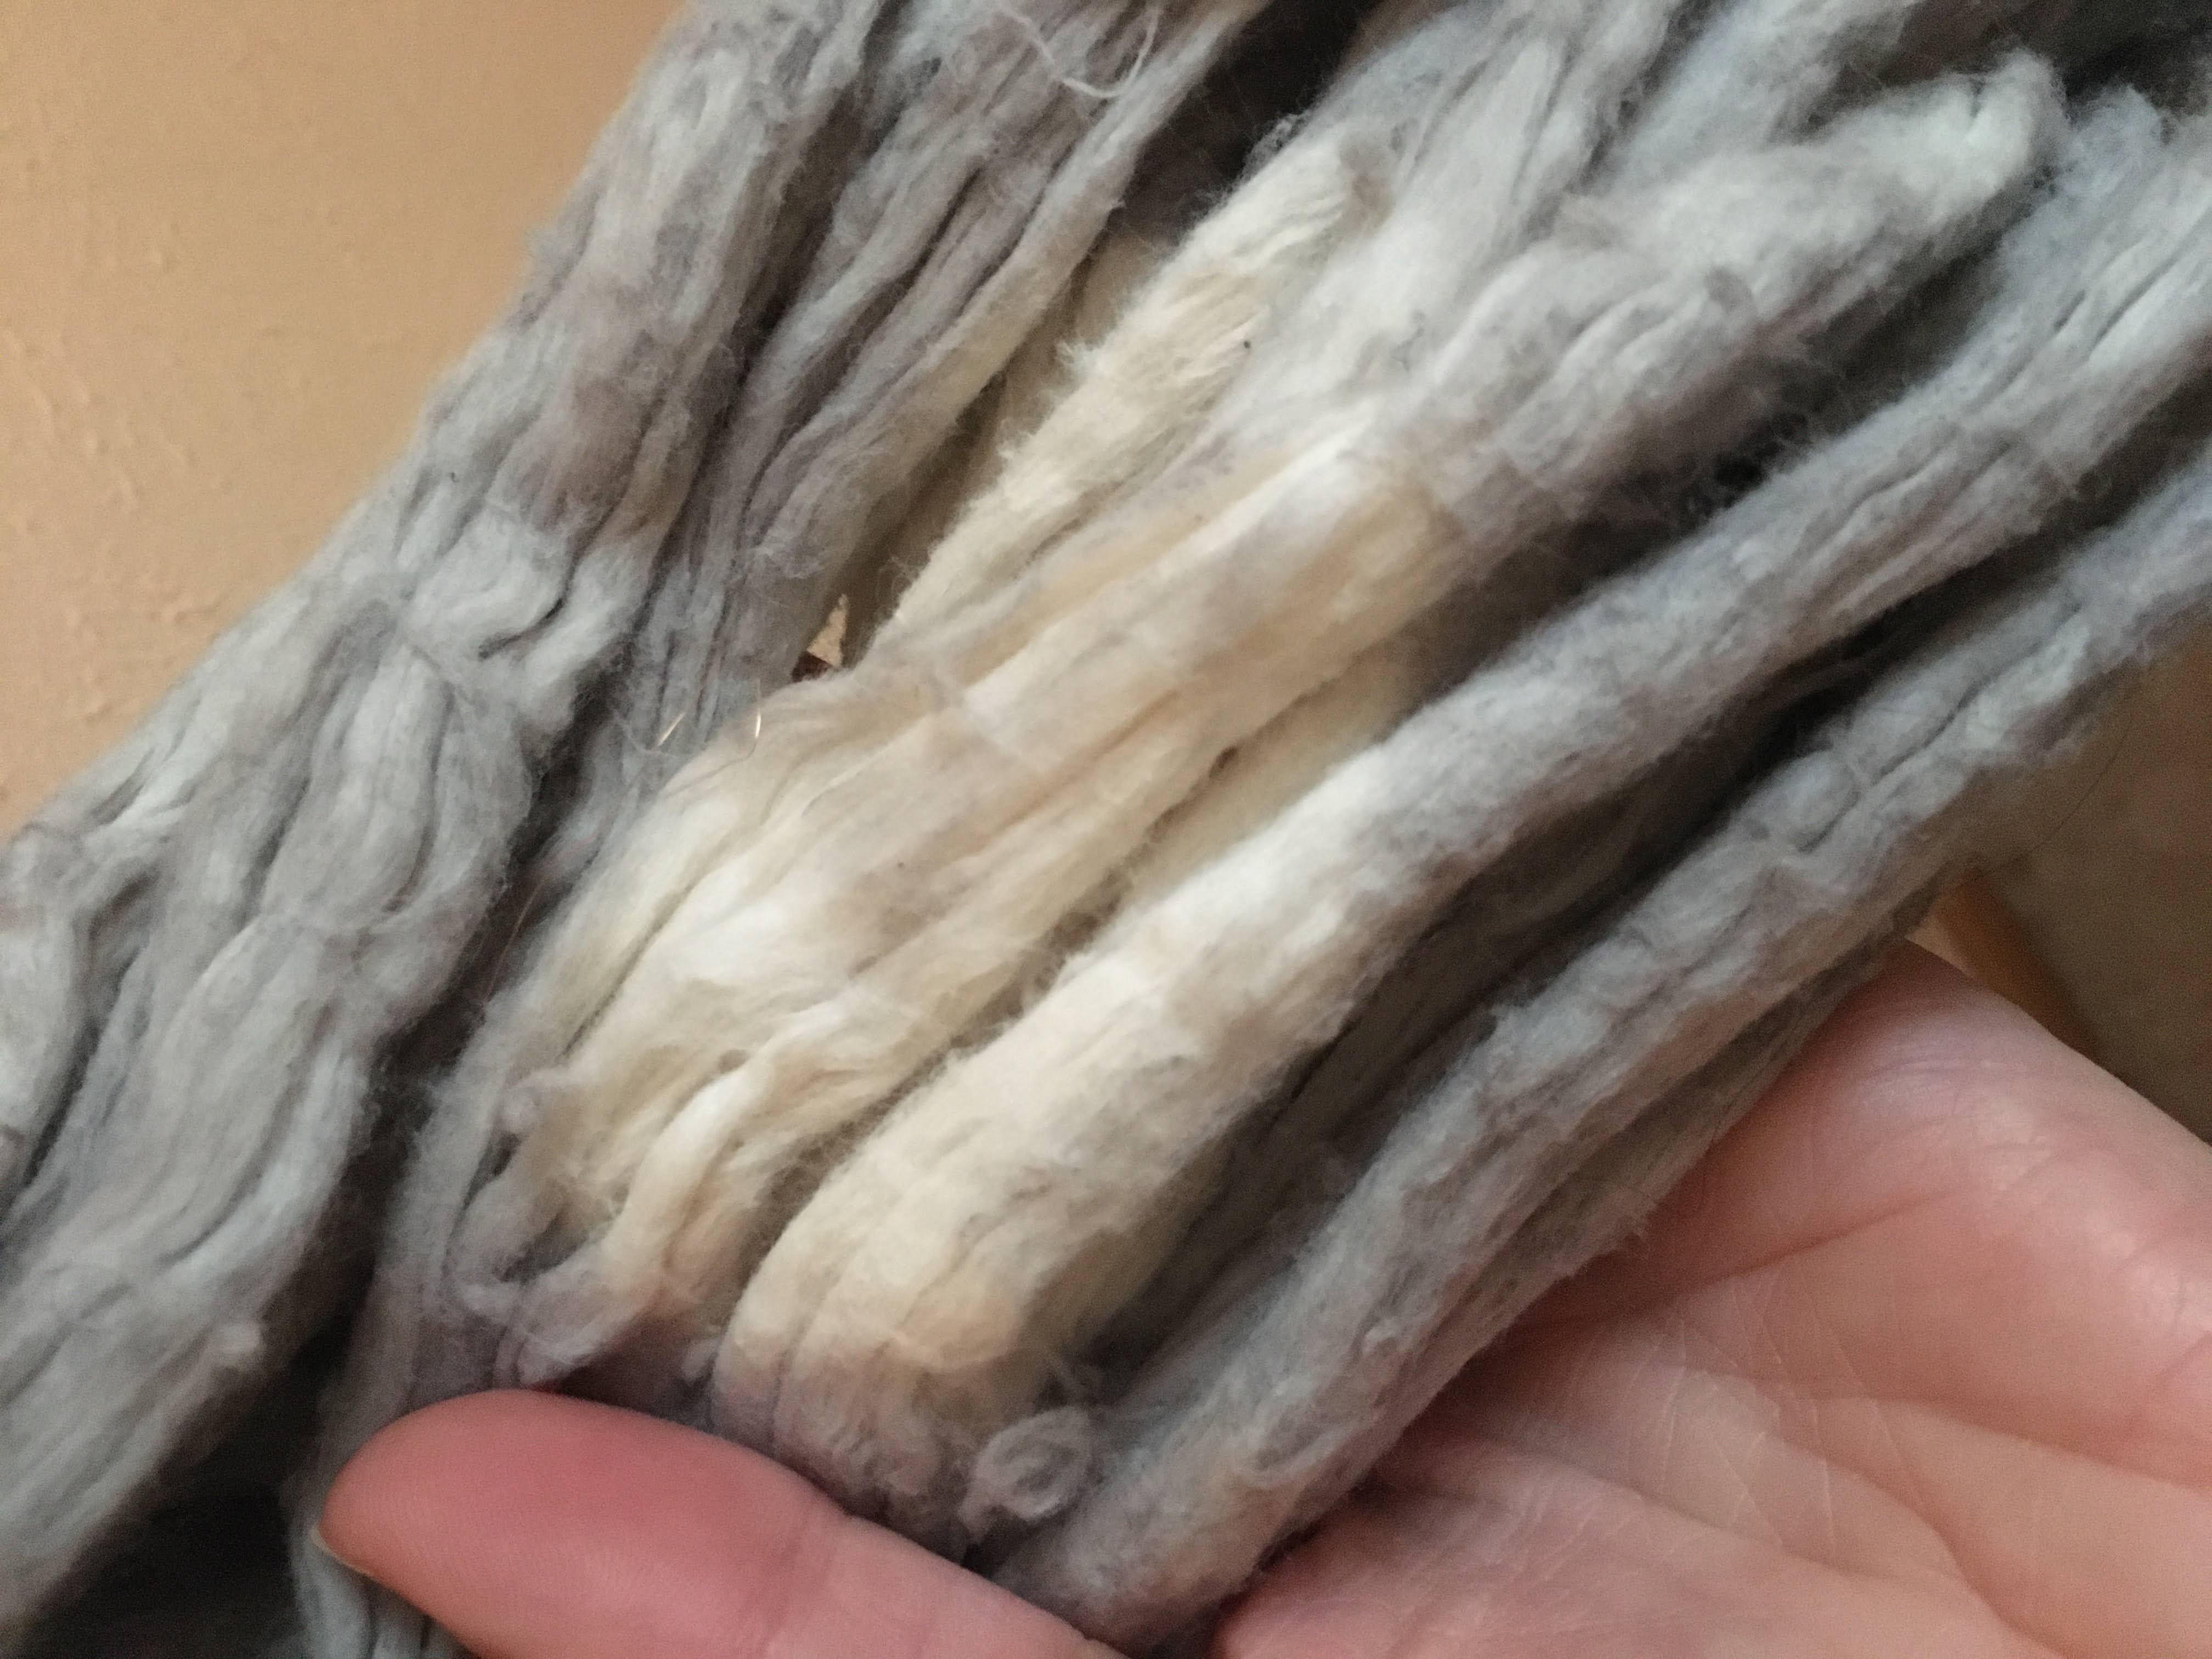
Prepare the dye bath and submerge your yarns following the package instructions. In this example, I started with raw cotton sliver
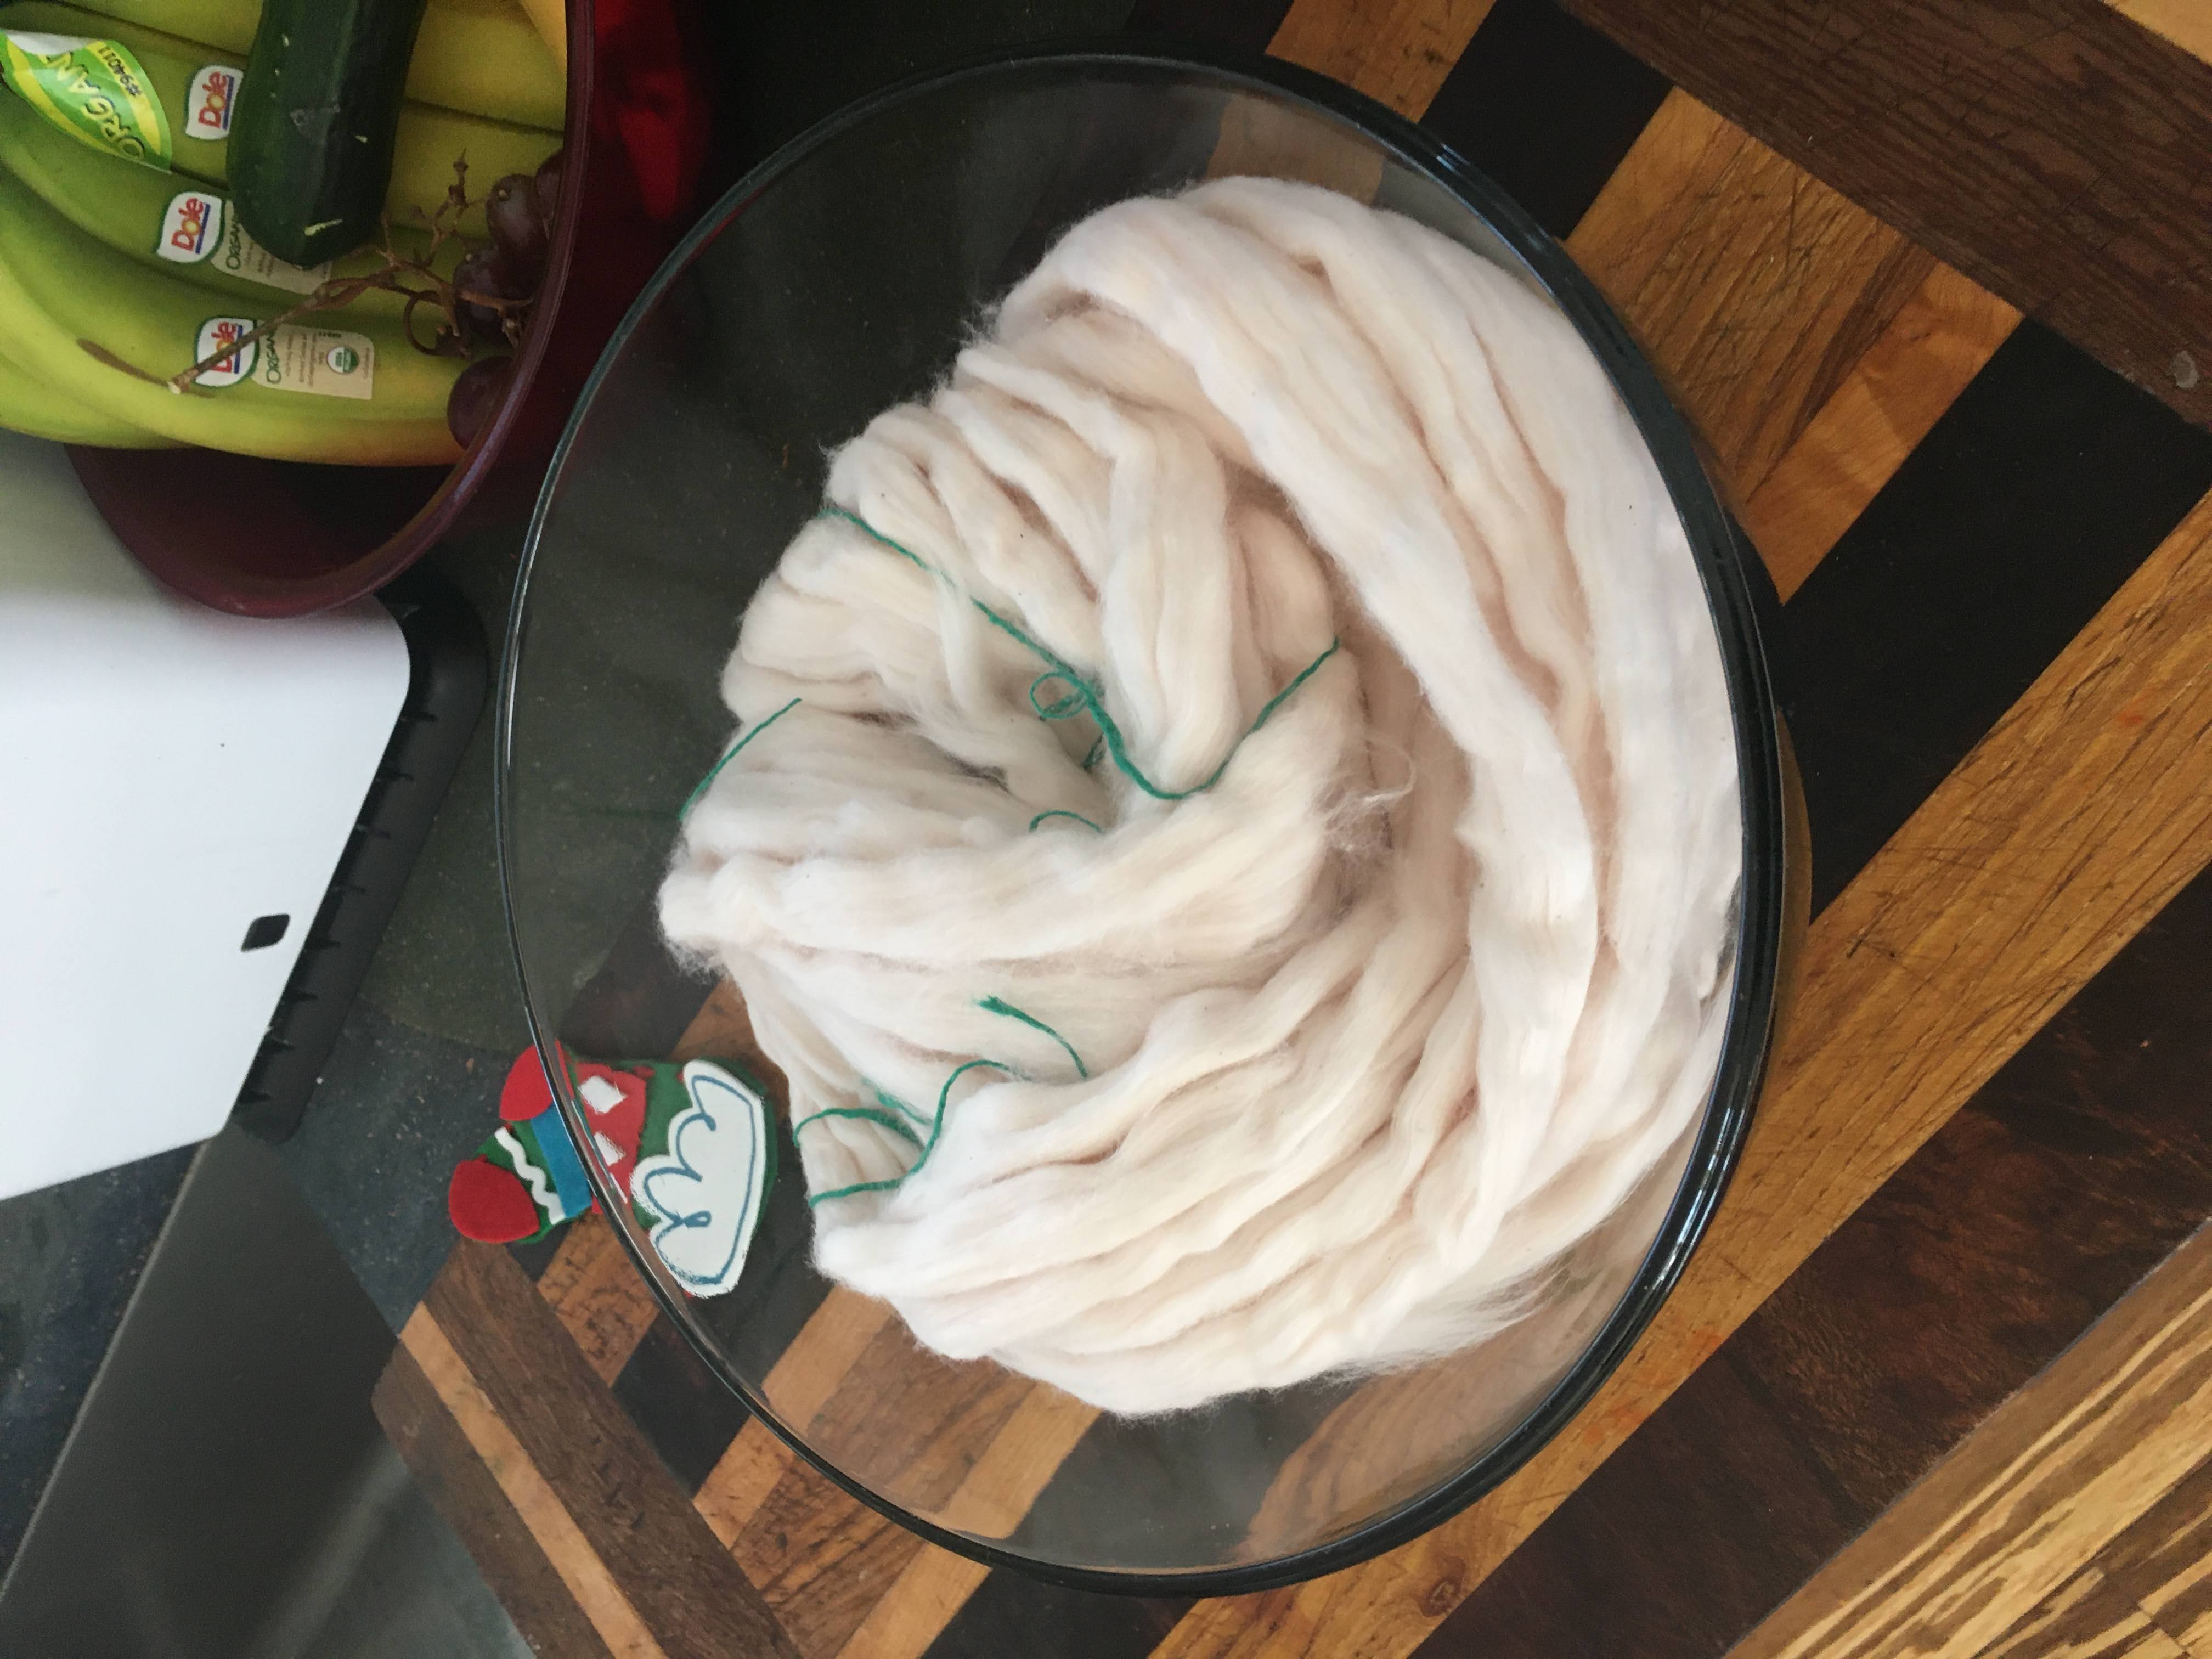
I submerged the fiber into the dye bath keeping it over constant heat.

After drying the sliver, I can breath upon to active the color change.
c. "Dying" Wool with Vinegar
A thrid technique we have used is to mix vinegar and the thermochromic pigments before submerging wool fiber. This is not a color-fast method, but it does create a nice temporary result.
d. Silkscreen
Many use silkscreen to apply thermochromic paints to fabrics in precise patterns. This technique is featured in Jingwen Zhu's Heart on Your Dress Project.
2. Integrate Heating Wire
Once you have prepared your fiber, you can integrate your heating wire using any of the techniques that follow. The key consideration is to create as tight a coupling between the wire and dyed fabric as possible. Any air between the wire and fiber will significantly reduce the heat transfer.
a. Sewing in the Magnet/Heating Wire
Hand sewing is a quick and easy for you to integrate your heating wire into your cloth. In the example below by Emilia Pucci, the heating wire is integrated by threading it into the surface every so often and otherwise, floating it along the back of the fabric. The heat, then, would appear in little spots as it radiated out from the wire on the surface of the cloth. You can read more on Emilia's post about the project. The key when sewing is to keep the ends of the magnet wire long so you can connect to them later. Also, don't cut the magent wire or anypoint, as that would break the eventual electric connection and result in the inability for the magnet wire to transfer heat.

b. Plying Magnet wire with Yarn
With plying, you create a tight coupling between the wire and yarn by twisting them together as showin in the diagram below (assume the "pink" yarn is your magent wire and the "black" yarn is the dyed yarn)
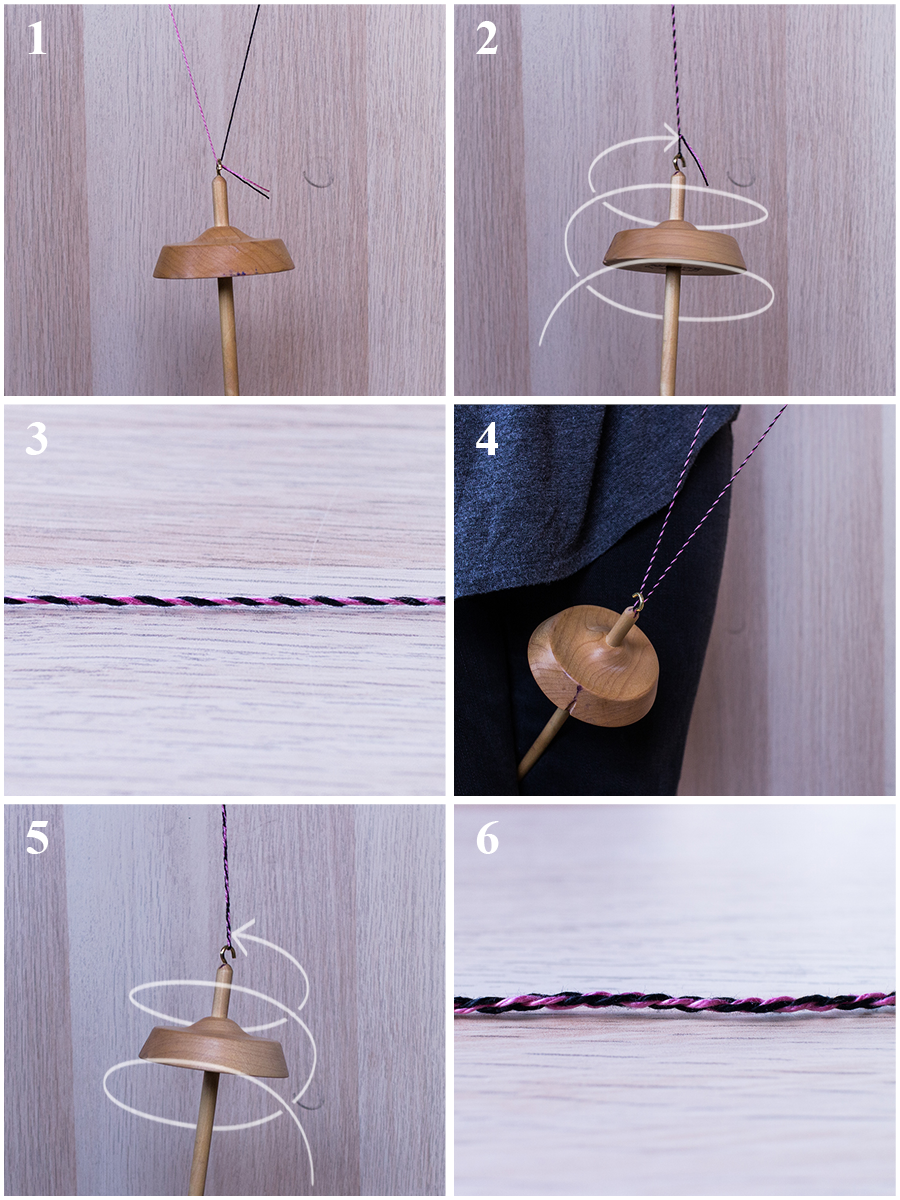 )
)
Anne-Marie Lavigne also has a nice video of this process as part of her Woven Signals project.
The benefit of plying is you can make really long lengths of heated yarn with a tight coupling of yarn to heating element. Also, the method of applying will put the connections on the same side of the reuslting yarn, allowing for easy connection.
b. Weave, Knit, Crochet
Alterantively, you can weave your heating wire directly into the fabric itself. The images below depict various ways that one or more heating wires were integrated to allow for different interactive effects. You can read more in this paper.
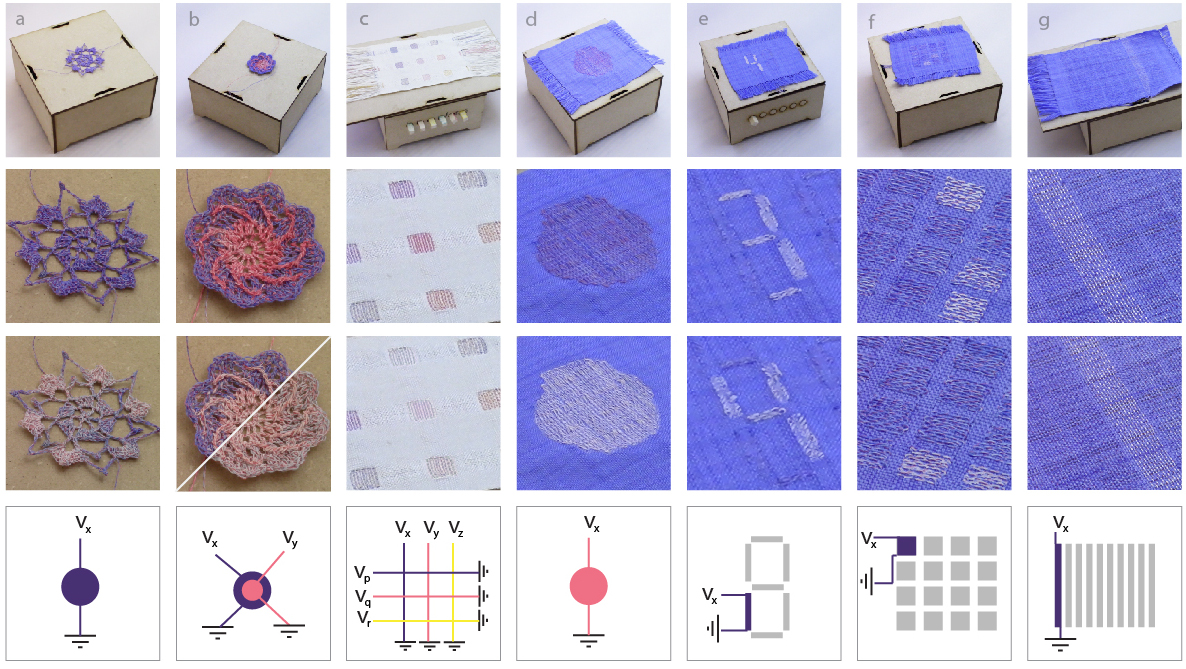
You can also integrate the heating wire and dyed yarn using a carry-along method in knitting or crochet. Here, you simply carry the magent wire along as you knit to integrate it. This creates some issues and complications with yarn tension and also may not create a tight coupling between yarn and wire, but it is possible.
3. Connect Heating Wires to Jumper Wires
Your heating wires have a thin insulated enamel coating that keeps their metal from shorting and conducting. To connect to the wire you need to either burn off the enamel coating with a lighter OR use sandpaper to scratch off the coating. You can use a multimeter to check that you can, in fact, make a direct connection with the wire.
Once you have exposed the metal in the heating wire, attach them to wires, aligator clips, or another type of connection using crimp beads. Namely, thread one end of your heating wire AND one end of the jumper wire through the crimp bead and then crimp the bead down to firmly attach the wires.
4. Connect to A Power Source
To activate the color change, we need to power our heating wire and make it heat up. Resistive heating is a power hungry operation and requires quite a bit of current and voltage. The longer your heating wire, the more current and voltage you will need. Since your Arudino only offers 5V in a digital output pin, and at most 500 mA of current, sometimes it is neccessary to power your project with an external power supply and "switch" that power on and off using a transistor. We'll show you each way below:
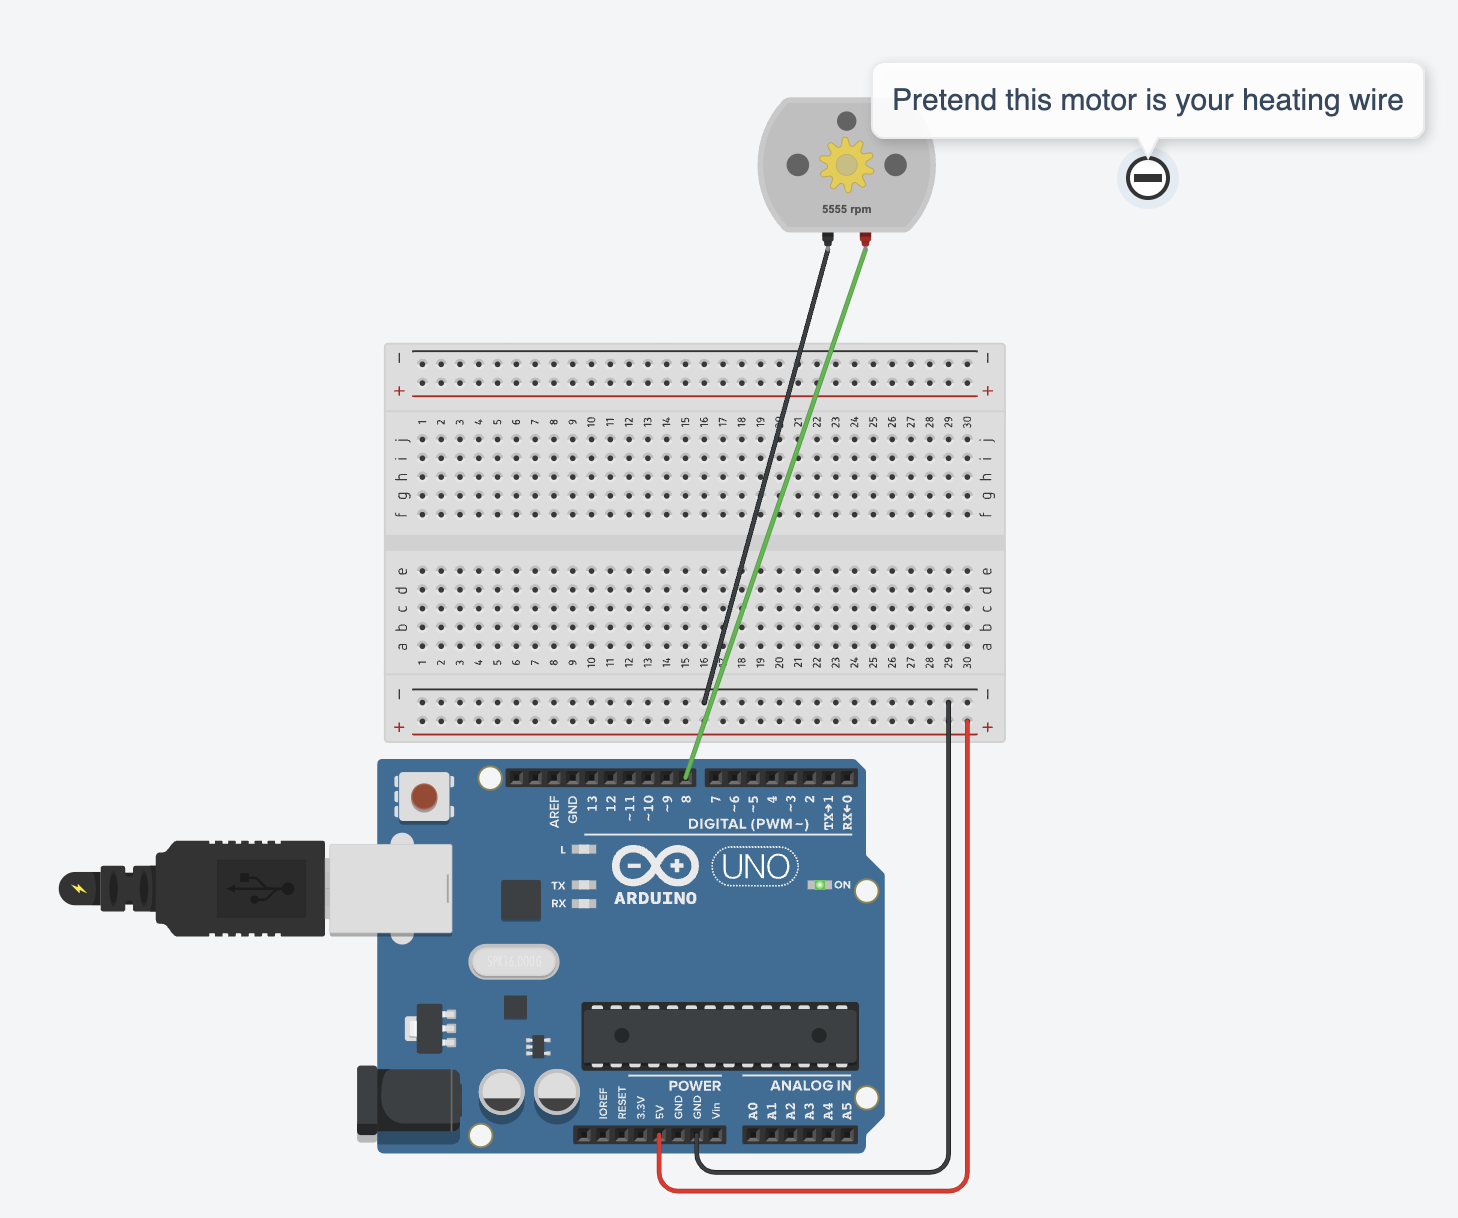
a. Direct Connection to Arduino
In this schematic, I'm using the motor to stand in for our heating wire. I do this because motors and heating wires consume similar amounts of power....but really they didn't have a thermochromic wire I could choose from in TinkerCAD. Here, we just connect one end of our wire to a digital out pin (in this case, pin 8), and the other end to ground.
b. Supplementing with an External Power Source
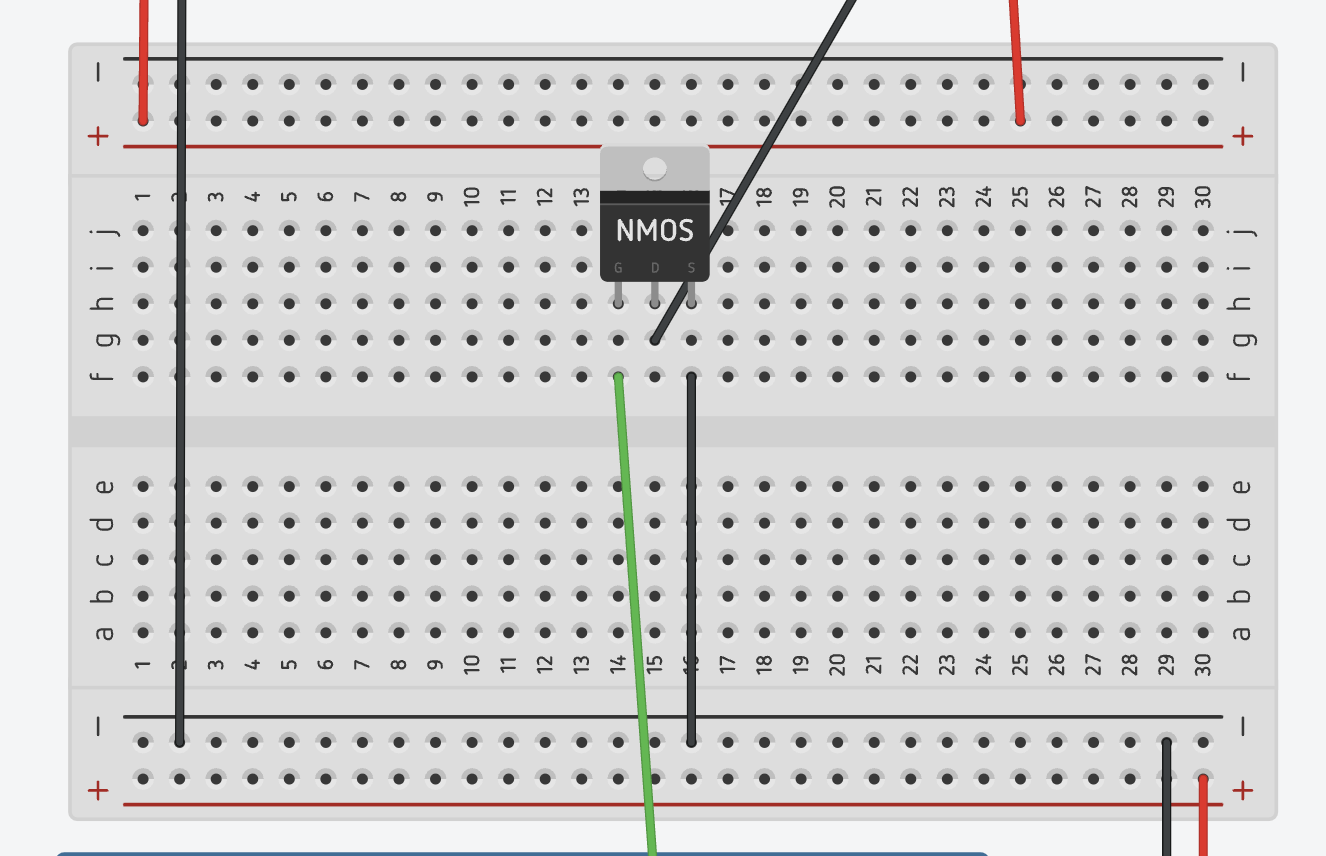
In this schematic, we'll draw from an external power source like a bench power supply or perhaps a 9V battery or directly to wall power. Again, the motor is standing in for the heating wire. Here we use pin 8 as a switch. When a voltage is applied to pin 8, it opens a path between the "drain" and "source" of the MOSFET. So, we can connect our heating wire directly to the power source and then create a switch on the way to ground that is controlled by the MOSFET.
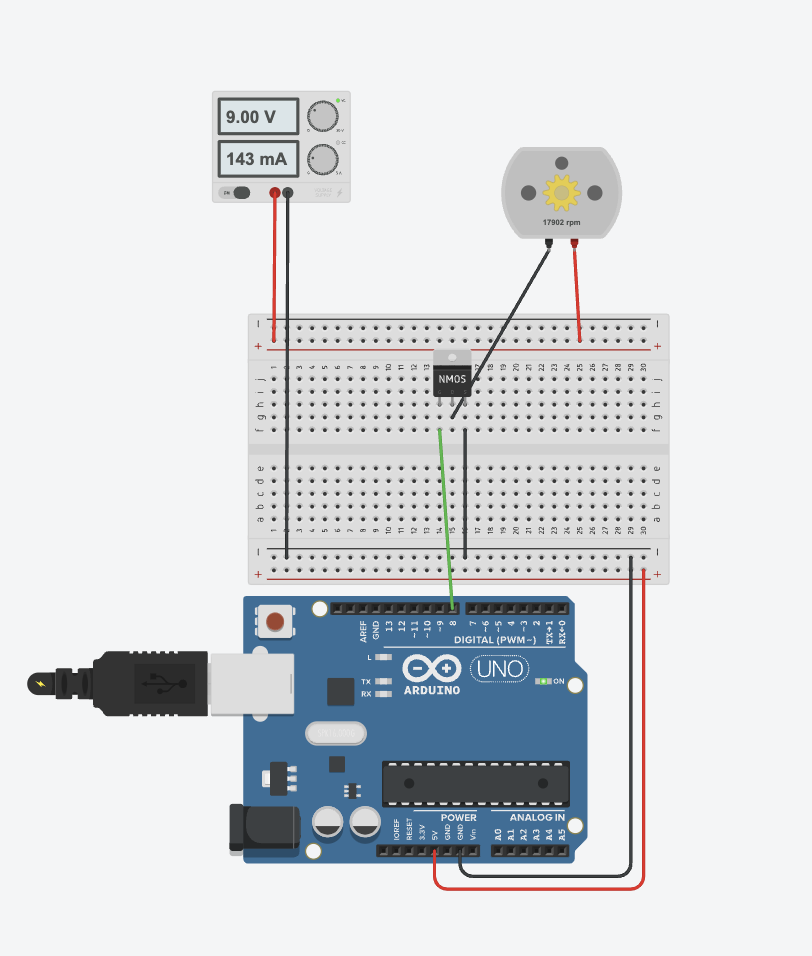
Double check your MOSFET to find the correct positions of the Gate, Source and Drain.
In this configuration, you can tinker with the voltage and current to determine an ideal running sceanrio (typically, supplying more voltage will reduce the amount of current consumed.)
Note, that you can "burn out" your heating wire if you supply it too much voltage, so be sure to start with a low voltage and work up to your desired heat. In my experience, the magnet wire will burn before it gets to a temperature that could burn you badly. This is not the case with other heating metals, like nicrhome, so I find its best to use materials like magent wire that heat, but don't get too hot.
Variations
There are endless variations and space to play in these projects
- Mixing thermochromics with different activation termperatures can allow for 3 color state transitions.
- Weave or knit the color changing yarn in with a non-thermochromic yarns of the same base color to create images that appear and disappear.
- Integrate multilple heating wires in different patterns to programmatically modify the patterns.