Frame Loom Weaving
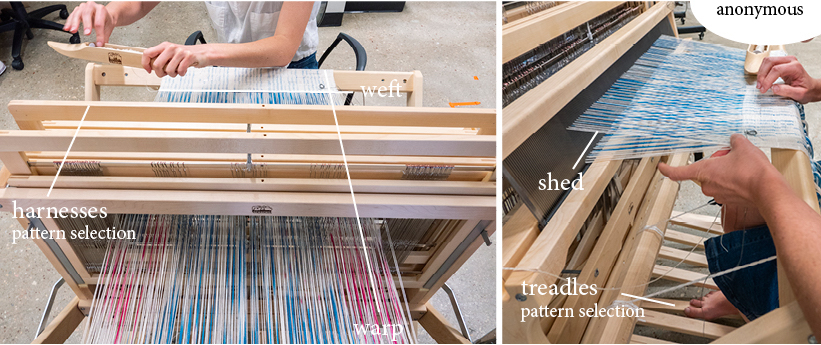
As you might expect, hand threading a yarn over and under every row can be tedious, which has given rise to the development of horizontal looms with heddles, or, contraptions that lift the warps for you. The heddles lift the yarn, and the weaver throws the yarn through the opening, or shed, lowers the heddles and beats the row they just laid to meet the fabric. The particular selection of heddles on any given row are called the pic. If you are looking to learn, Peggy Osterkamp is the go to source for learning. Many heddle based looms consist of the use of frames (which contain sets of heddles) and treadles which easily allow different frames to be lifted in combination with one another.
Weaving on a Rigid Heddle Looms
Rigid heddle looms often have one frame, making it easy to quickly weaving tabby and inviting the weaver to play with other hand techniques integrated with the tabby.
Frame/Shaft Looms
Frame or Shaft looms are made to fit on table tops or floors and can have 2 to as many as 24 frames, depending on the loom. Frame looms also come in a variety of widths. When warping, the weaver threads each frame with a particular sequence of warps (most simply, a "straight draw" which takes every 1st warp and puts it on frame one, every 2nd on frame two, every 3rd on frame three (and so on). To create a pattern, then, one "lifts" the frames that give them their desired pic. The lifting is done by hand or by the use of treadles, foot pedals that attach to different sets of frames allowing you to select them. Frame looms make it easier and faster to produce repeating patterns. Some frame looms are computer controlled, allowing motors to lift the frame rather than pedals. These are often called dobby looms. The loom shown in the image above is a 8-shaft Floor Loom. Further specifications (e.g. jack loom, countermarch) describe the mechanisms that raise and lower the heddles (and often make it physically easier to do so, especially with large numbers of shafts and or wide widths).
Frame Loom Draft:
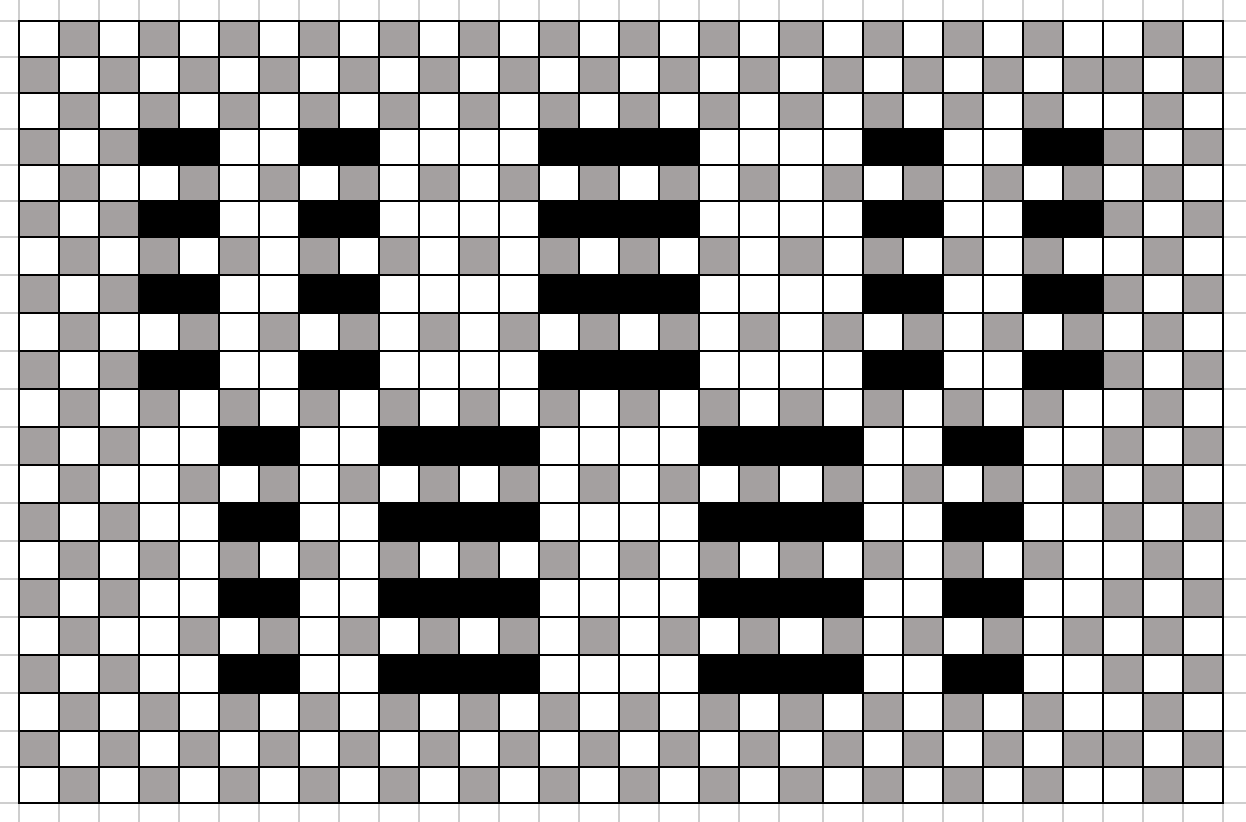
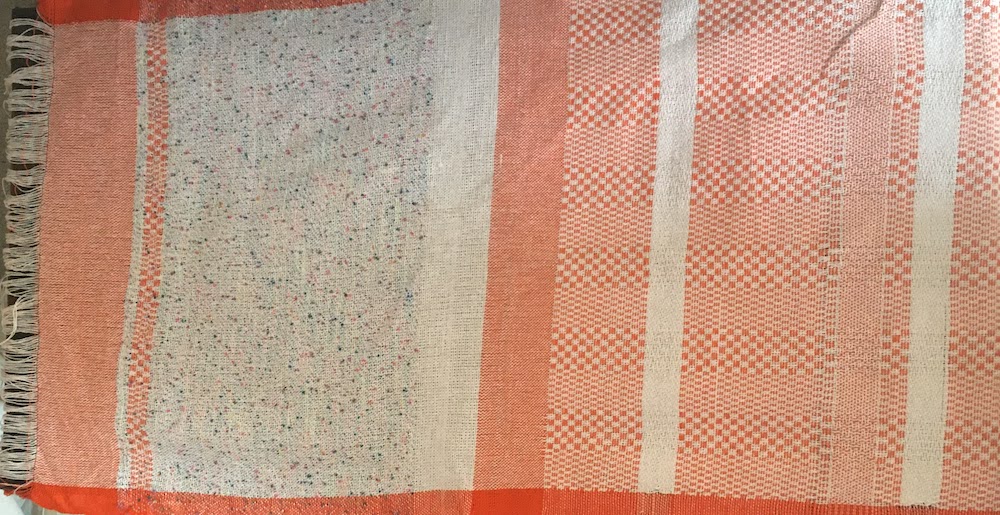
This is a draft that I created for my frame loom that shows the primary units that repeat across the width of the fabric. To help with my process, I use non-white to represent any area where the Weft travels UNDER warp, but different shades to different colors of material. The resulting material looked like this (horizontal is the length/warp). What is interesting to note is that every section of the weave was created by components of this draft, but that changing materials in both the warp and weft really create the visual pattern. It is also good to reming yourself that when you weave, it will not be square like your draft, thus, you often have to make adjust your draft to what "square" means in your draft. For instance, in the weave below a square was composed of about 20 warps and 30 wefts.
Yet, above I cropped the most important part out of the picture, which is the part of the draft that represents how to thread the frames, tie up the frames to the treadles, and shows the treadling pattern. If you need a refresher on how the loom works, you can reread the process section for weaving on heddle-based looms. So now here is the full picture:
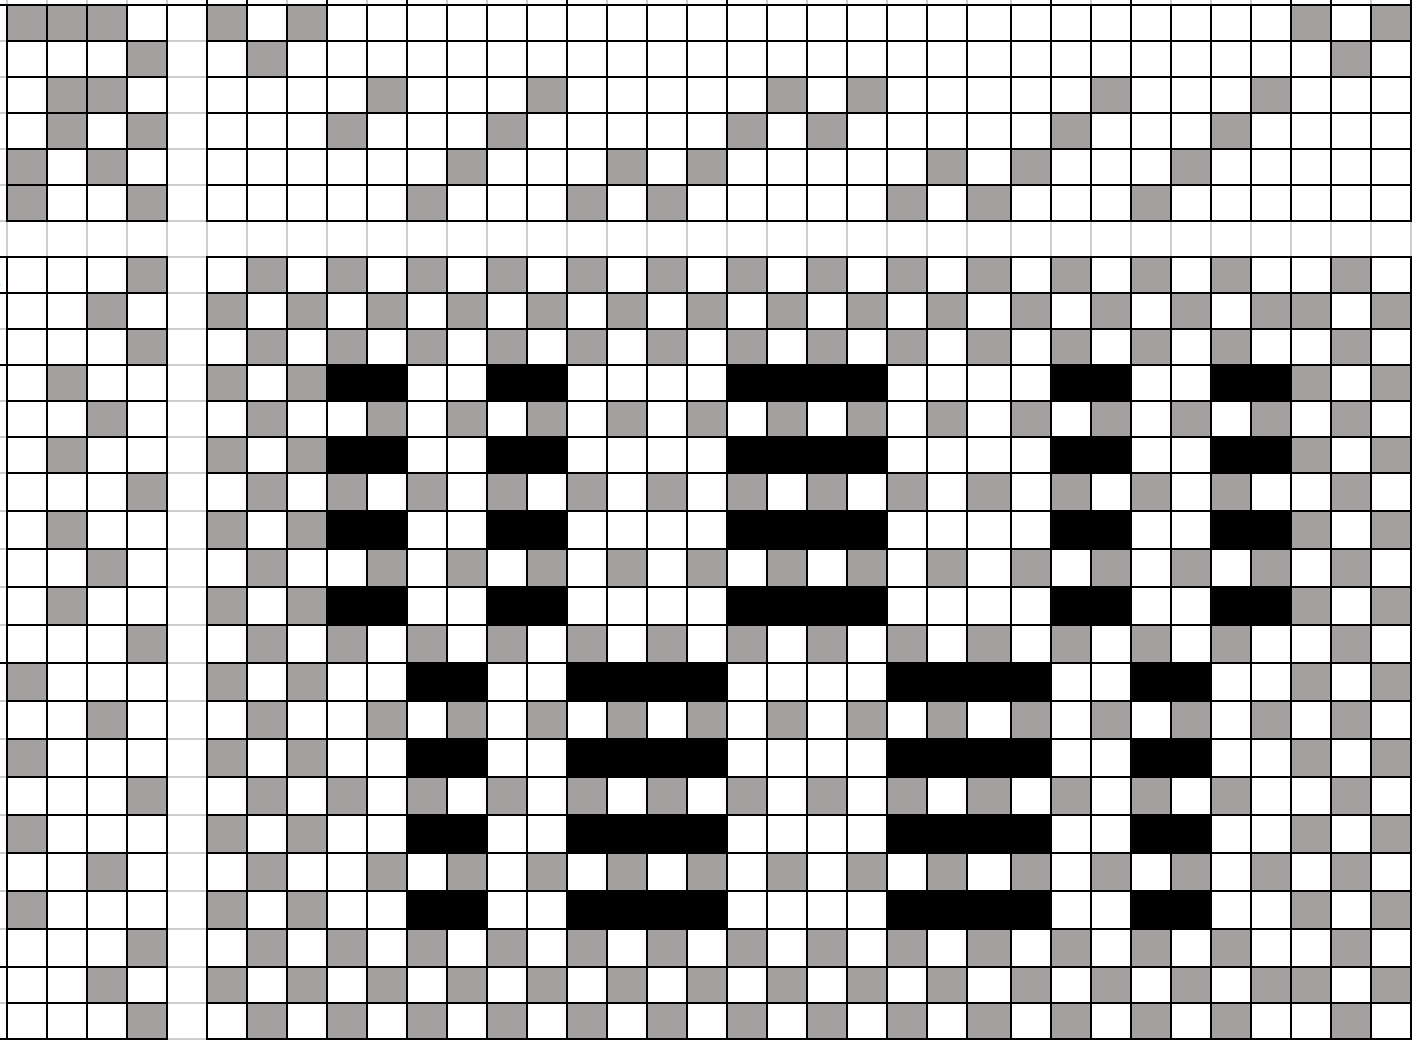
The top left shows the tie up, the top row shows the threading, and the left shows the treadleing. The grid in the bottom right, shown before, is called the draw down.
Interpreting a Draft
First of all, if you have time, you are free to ignore all the other business and follow the pattern in the lowest and rightmost grid and simply do all the over/undering by hand. So the first row would be over 1, under 1, over 1, under 1 and on and on. The next would be over 1, under 1, and so on.
If you have a loom with heddles, it will save you immense amounts of time. As such, when you would go to make this pattern on your loom, you would begin with the threading, threading each warp through the frame indicated by the grid. So on this draft, you would thread the left-most warp to the 6th frame, the next to the 5th, the next to the 6th, then the 3rd, 4th, 1st, 2nd, and so on and so forth. Typically, the "first" frame is the one closest to the fabric beam or the front of the loom and they are numbered successively from front to back. Another explanation can be found here: https://weavingspace.co.uk/blog/threading-draft/
When you are done threading, you would then work on the tie up (if you're loom has pedals, otherwise you might have to select these frames by hand on each row by raising and lowering levers that raise and lower frames in different combinations. The tie up, thus, represents which frames need to be lifted in any given pic to achieve your desire pattern. So from left to right, I would start by tying frames 1, 2 and 6 to the first treadle. Then I would tie 3,4, and 6 to the next treadle. Then 2, 4, 6 to the next, and 1,3,5 to the last. You can find additional details here: https://weavingspace.co.uk/blog/reading-a-tie-up/
When you sit down at the loom to weave you refer to the left most grid to understand the treadling. This is the order in which you push the pedals (or lift the levers) in order to get the pattern represented in the lowest and right most grid. Put another way, it represents the specific pics that have to be repeated to obtain the structure. Here is another explanation: https://weavingspace.co.uk/blog/treadling/
Writing a Draft
Sometimes you know the structure you want, but not the machine settings to obtain that pattern. Or you have a textile you want to mimic, but you don't have the draft at all. You can do this by first looking very very closely at the fabric and manually marking the draw-down where you note over and unders. Some people photocopy their fabric and enlarge it to make this simpler, or take apart the fabric row by row to understand the order of threads and over/unders.
I think the Weaving Space blog offers a nice tutorial on a way of doing this that is more germane to weavers but I tend to approach it like a computer scientist. Once you have the draw down you follow an algorithm, told in pseudo-code below:
- For each column c in the draw down
- Look at all the cells in c and represent the sequence from top to bottom as a bitstring (e.g. 0 meaning white, 1 meaning black; sequence reading as (0, 1, 0, 1, 0, ......, 1))
- if this if the first column OR the bitstring is DIFFERENT from one you have seen previously:
- assign it (fill in the cell) in the next unused frame in the column c on the above threading pattern.
- if you have seen this pattern before
- assign it (fill in the cell) of the column c in the above threading pattern in the same frame row that corresponds to the column of which the pattern is a repeat.
- if this if the first column OR the bitstring is DIFFERENT from one you have seen previously:
- Look at all the cells in c and represent the sequence from top to bottom as a bitstring (e.g. 0 meaning white, 1 meaning black; sequence reading as (0, 1, 0, 1, 0, ......, 1))
- For each row r in the draw down
- Look at all the cells in r from left to right and represent the sequence of cells as a bitstring (e.g. 0 meaning white, 1 meaning black; sequence reading as (0, 1, 0, 1, 0, ......, 1))
- if this if the first row OR the bitstring is DIFFERENT from one you have seen previously:
- assign it (fill in the cell) in the next unused treadle column in the row r on the treadling pattern to the left.
- if you have seen this pattern before
- assign it (fill in the cell) of the row r in the treadling pattern on the left in the same column that corresponds to the row of which the pattern is a repeat.
- if this if the first row OR the bitstring is DIFFERENT from one you have seen previously:
- Look at all the cells in r from left to right and represent the sequence of cells as a bitstring (e.g. 0 meaning white, 1 meaning black; sequence reading as (0, 1, 0, 1, 0, ......, 1))
- For each row r in the treading pattern;
- scan until you find the column that is assigned to this row, call that c
- look at the draw-down for row r, for each cell in r of the draw-down;
- if the cell is white, do nothing
- if the cell is black, locate the assigned threading frame row f that corresponds to that draw down cell, and color the cell at row f and column c in the tie down black.
- look at the draw-down for row r, for each cell in r of the draw-down;
- scan until you find the column that is assigned to this row, call that c