Traces #
A trace is a conductive material that carries electricity from one location in your circuit to another. In traditional electronics, your traces are usually insulated wires with uninsulated tips that you plug into a breadboard or solder together.
In soft electronics traces can be created from a single thread traveling through a material, a conductive fabric or paint fused to the surface of a fabric or a single thread of material integrated into a knit or woven structure. Traces are attached through more inventive connection methods.
Most “smart” features of garments are created by remaking existing sensors and actuators using traces alone - as traces configured in particular patterns (spirals, coils, etc) can produce emergent properties such as magnetism, etc.
Making Traces #
When thinking about circuit traces in textiles you can consider using flexible metal wires or threads like the following:
- 30 AWG silicone coated wires. These are thin, flexible, highly conductive, and easy to sew or weave. They also come in many different colors. Cost effective.
- 28AWG - 30AWG magnet wire. This has thin enamel coating that is clear. It’s thick enough to work with, but thin enough to be flexible. Anything thinner breaks too easily. Its very conductive.
- Karl Grimm Copper or Silver Thread. Much harder to get and uninsulated but highly conductive and solderable.
- Stainless Steel Yarn. Hard to get in the US (requires EU shipping address) but good quality stainless threads and yarns.
We have selected this list focusing on materials that have low resistances, because, in general traces in a circuit should move as much electricity as possible. If you find some other yarns you’d like to use that say they are metallic, be sure to check them with a multimeter first to ensure they are actually conductive enough for what you need. The video belows gives you more tips and resources how to do this:
General Strategies to Integrating Traces into Textiles #
When thinking about how you might integrate traces into woven or knitting structures, you can consider the condutive yarn as a kind of pattern element that you need to pattern in a particular way. Specifically, you need a single yarn to form a path from one spot in your textile to the next. There are a number of ways to do this, which we highlight below.
Consider the size Ratios between Conductive and Non-Conductive Yarns. #
One of the most common challenges of intergrating condutive traces is that conductive threads are not easy to source in a wide range of sizes, and often are much thinner compared to weaving and knitting yarns. They also have different characteristics due to their metallic nature, for example, they like to arch and wiggle in different ways. For these reasons, mixing them into cloth can require some special techniques.
The “Simple” Approach #
If your conductive yarns or threads are very thin and your non-conductive much thicker (as is often the case) consider integrating the conductive as a supplemental material in certain regions of the pattern. In knitting, this means simply carrying the conductive along with the base yarn and knitting the two yarns at once as seen in Irene Posch’s Early Winter Night Biking Gloves. In weaving, this means throwing two materials in a pic at once (your conductive and non-conductive) in the regions where the material is required following an inlay techniques:
To desribe the inlay techinque more deeply. Consider figure b in the image below:
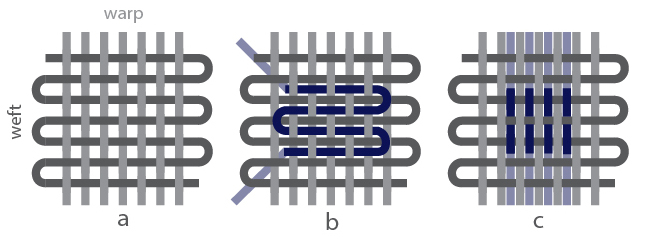
Where ‘a’ shows the “base” structure of the textile, ‘b’ shows how a second or “supplemental” weft yarn can be integrated into the textile structure while weaving in a continuous fashion by integrating a yarn only in specified section of the cloth. Figure ‘c’ shows that this is possible with supplemental warps as well, yet, I tend to avoid using supplemental warps for traces because they require more setup and are more difficult to make continuous. You can see many different possibilities of supplmental wefts below.

When logging my process in the form of woven drafts, I like to describe supplemental wefts as a second weft weft system (e.g. the base cloth is one system, supplemental weft as the other) that is interlaced, line by line, into a base draft as shown below:
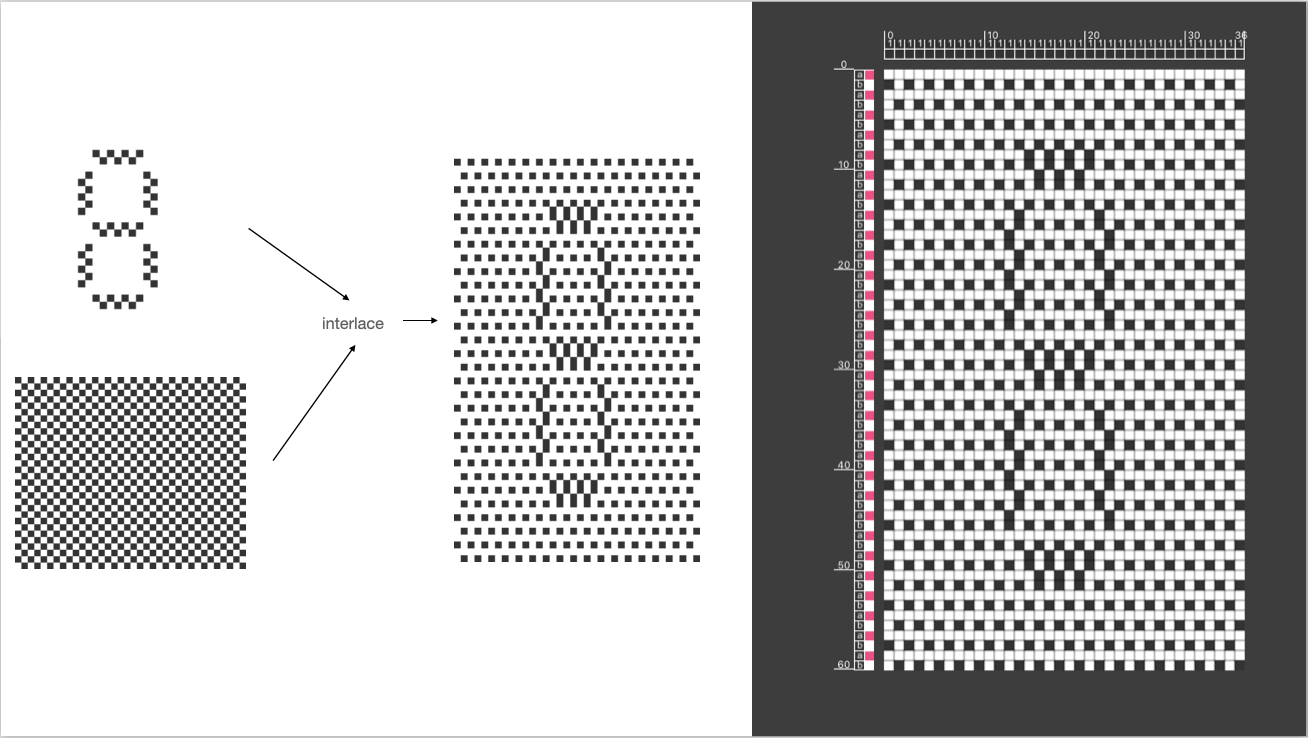
Here, I can thread my loom to support the base draft and insert the supplemental yarns in the indicated regions by hand because it follows the same pattern as the base path.
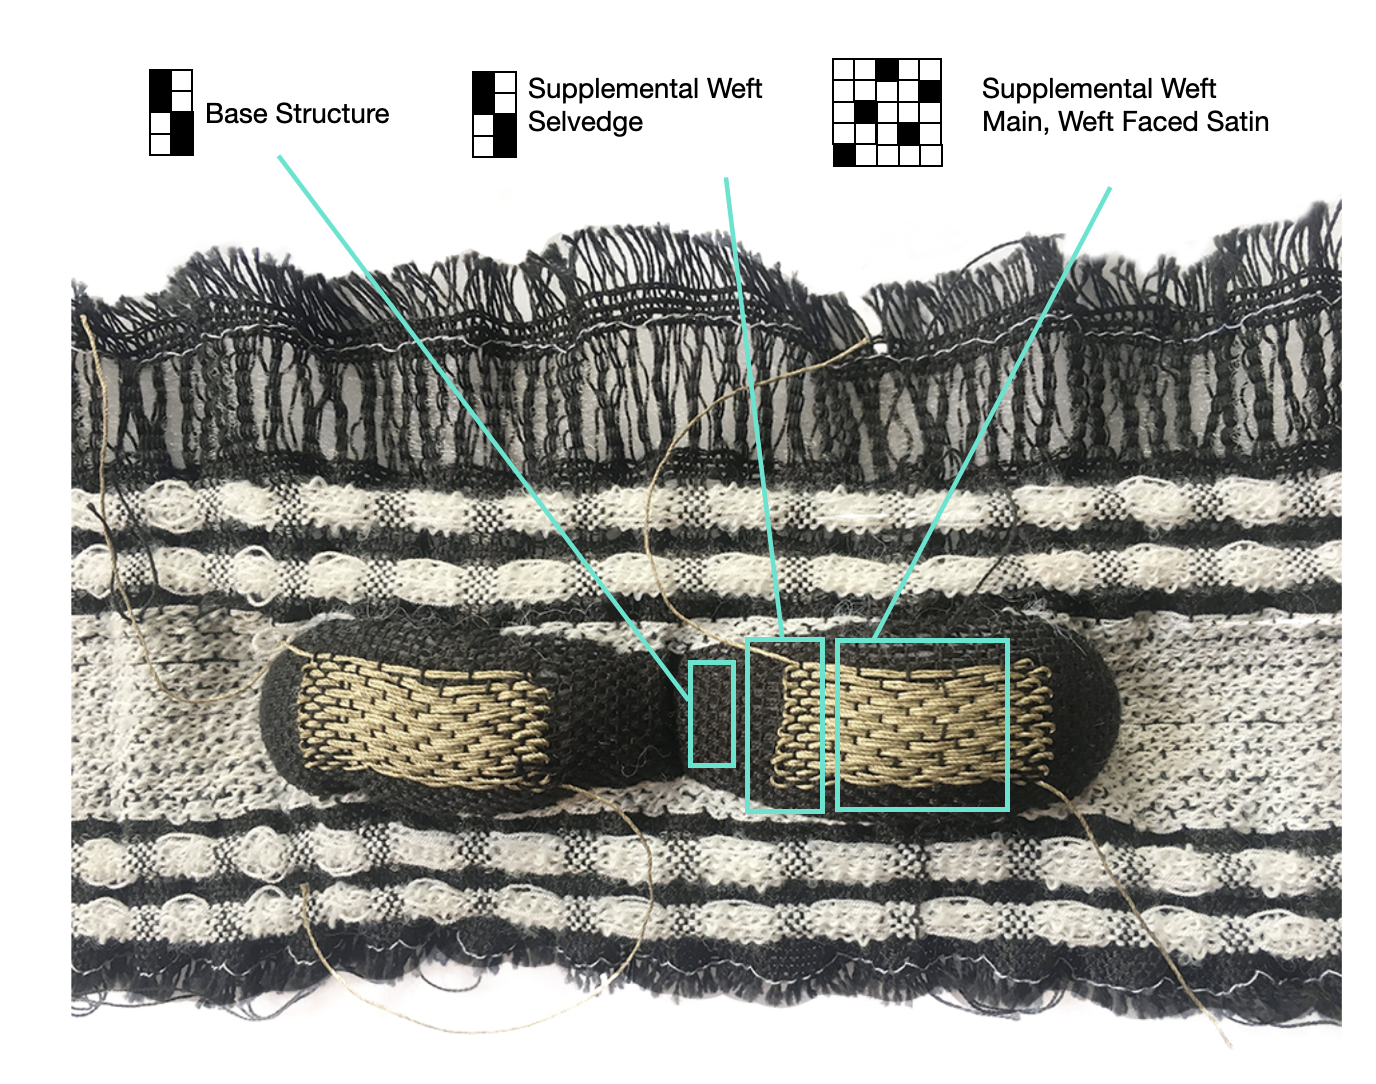
When weaving on a TC2 jacquard, I upload the entire bitmap and wind small shuttles of my conductive traces to integrate in the smaller regions. In the draft above, I would then wind seven individual bobbins (one for each segment) and integrate them as indicated by the draft. In the regions where the segment runs vertically, I just tuck the weft under one end each pic, gradually working it up the length of the cloth. Your supplemental weft and base cloth do not need to follow the same path for instance, you may wish to float more of the supplemental weft on the surface by using a weft-faced twill. In these cases, make sure your artwork is large enough to support at least one interlacement per pic and to perhaps add a small selvedge region around the supplemental weft to make sure the ends of the square regions are cleaned and consistently caught and worked into the cloth as seen in this draft for a woven electrode. The image below details how using a different stitich on the supplemental region can allow the traces to float above the base cloth, yet, will often require the use of a selvedge/catching stitch on either side to ensure clean edges.
The Advanced (and not always better) Approach #
Pick a base non-conductive yarn that is just as thin as your conductive and integrate it only in the required regions. In knitting, this can be achieved with techinques similar to intasia:
This tecnique is used by Irene Posch with the Knitted Capacitor.
In weaving, the selective placement of two materials along the weft requires time-expensive weft interchanges where the conductive and non-conductive yarns are manually worked across a portion of the cloth width and looped around eachother on either side. This can be accomplished by threading one stitch across the width of the cloth and manually interlocking the desired conductive yarns in place as shown here:

In this example, color-changing conductive yarns have been integrated into the cloth manually such that the base cloth does not run the entire width.
Many Ways of Making Traces #
Weaving and knitting aren’t the only way to integrate conductive material into cloth and other opportunities exist at different stages of the design pipeline as described below:
| Process | Example |
|---|---|
| Combing and Carding | |
| Spinning | Spinning sensor yarn and Spinning conductive/resistive yarn |
| Extruding/3D printing | DIY Conductive Filament |
| Plying | Plying Conductive Yarn |
| Braiding | |
| Paper-Making | |
| Growing | Growing wires in roses? |
| Knitting | Knitting traces to make a finger sensor (see tutorial slides at end of page |
| Weaving | Woven Cable |
| Embroidery | Embroidered or Laid Traces |
| Felting | |
| Coating | |
| Dying | |
| Bonding | Fused Copper to fabric |
| Etching | |
| Pleating | |
| Electrospinning | |
| Sewing | Sewing Traces Tutorial |